De blog heet Miriam's Vlecht Lessen, maar de waarheid is dat vlechten soms niet heel praktisch zijn, zeker niet bij spelende kinderen of sportactiviteiten. Hoe je ook je best doet, er piepen steeds meer plukken haar uit de vlecht en na een tijdje is het net alsof je nooit een vlecht gedaan hebt.
Een oplossing hiervoor kan een doorhaalvlecht zijn (in het Engels pull through braid). Hierbij gebruik je elastiekjes om een soort nep-vlecht te maken. Het voordeel hiervan is dat de vlecht veel beter blijft zitten. Ideaal dus voor activiteiten met veel beweging!
De doorhaalvlecht is op twee verschillende manieren te maken: je kunt het haar in tweeën verdelen (een bovenste en onderste pluk) en de onderste pluk door de bovenste halen (een gewone doorhaalvlecht) of je kunt de onderste pluk in tweeën verdelen en de plukken om de bovenste pluk heen brengen (een 'omgekeerde' doorhaalvlecht).
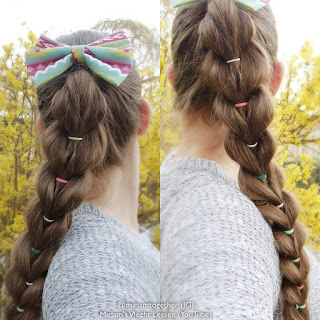
Eind juni zal er op mijn YouTube kanaal een filmpje online komen over een doorhaalvlecht (zie de foto hieronder). Kan je niet zo lang wachten, bestel dan mijn boek Miriam's Vlecht Lessen via bol.com - daarin staat de techniek stap voor stap uitgelegd met tekst en foto's!
Doorhaalvlecht met kleine vlechtjes - een filmpje hierover volgt eind juni op mijn YouTube kanaal!
Pull through braid with micro braids - you can find a tutorial on my YouTube channel the end of June!
'Omgekeerde' doorhaalvlecht
Reversed pull through braid
Pull through braids
The blog is called Miriam's Vlecht Lessen, which means Miriam's braiding instructions. The truth, however, is that braids sometimes aren't practical at all. Think of playing kids or sport activities. You can try your best, but after a while you'll see more and more strands trying to get out of the braid and finally it seems like you've never even done a braid.
A solution for this can be a pull through braid. For this braid you'll use elastics to kind of create a fake braid. The advantage is that the braid will stay in much better, so it's ideal for activities with loads of movement!
The pull through braid can be done in two different ways: you can divide the hair into two strands (a top and bottom strand) and pull the bottom strand through the top strand (a regular pull through braid) or you can divide the bottom strand into two and bring those strands around the top strand (a reversed pull through braid).
At the end of June you'll be able to find a tutorial on a pull through braid on my YouTube channel (check the photo above). Make sure to subscribe so you won't miss it!


Geen opmerkingen:
Een reactie posten